Once you’ve created a Stripe account and have acquired an SSL certificate, you’re ready to write the form through which you’ll accept payments to be processed via Stripe. This is surprisingly simple to do, and completely secure when done right. In this post, I’ll explain what you need to do with your HTML.
Two Traditional Payment Approaches
Before discussing the form, you should be clear as to how Stripe works compared to traditional payment processing approaches. Historically, depending upon the payment system in use, there were two possible processes:
- The user is sent from your site to the payment processor’s site, where the payment information will be taken. The user is then hopefully returned to your site.
- Your site takes the payment information and passes it to the payment processor behind the scenes. The user never leaves your site.
In both scenarios, the user’s payment information needs to get to the payment processor, and the payment processer needs to convey the success of that payment back to your site. What people normally think of as PayPal takes the first approach. Other payment gateways, such as Authorize.net, traditionally use the second approach.
Many payment processors, including PayPal and Authorize.net, now support both onsite or offsite payment processing (not at the same time, but you can choose which approach you want to use).
In the first scenario, the user is aware that she is leaving your site, you’re limited in how much you can customize that experience, and you have to put in a fair amount of work on your site to verify that the payment was made. On the other hand, because your site is not handling any of the payment information, you have a limited amount of risk.
With the second scenario, the user never leaves your site, you can completely customize the experience, and it’s easier to confirm that a successful payment was made. However, your security risk and exposure goes from being rather minimal to extremely serious.
If a user’s credit card or other payment information reaches your server, you must be PCI compliant and take many more steps to protect both the user and your business. In short, not only should you never store the user’s payment information, you really ought not to have it in your possession either, even momentarily.
Stripe’s Approach
Stripe has developed a great middle ground between these two approaches. Thanks to the Stripe.js JavaScript library, you can have your proverbial cake and eat it, too. Using Stripe.js, the user never leaves your website AND you aren’t exposed to extra security risks because the user’s payment information will not touch your server. The process works like so:
- You create a form on your website that accepts the payment details.
- You include a Stripe JavaScript library on the page.
- You write a JavaScript function that watches for the form submission (i.e., you create an event handler for the form’s submission).
- When the form is submitted, the user’s payment details are securely sent to Stripe via Ajax.
- Stripe will confirm that the payment information is valid and return a token that uniquely identifies that payment information.
- The JavaScript function that handles the Ajax response stores the token in a hidden form element and submits the form.
- The server-side script (aka, the PHP code) that handles the form’s submission uses the token to actually process the payment.
So the customer never leaves your site but the payment information never hits your server: the best of both worlds. (This is the process when all works well; payment verification errors introduce new processes.)
In this post, I’ll explain how to set this all up in your HTML. In the next post, I’ll walk you through the necessary JavaScript functions. And in the following post, I’ll start creating the PHP code that performs the payment request.
The HTML Page and Form
To start, you need to include the Stripe.js library on your payment page:
\[html\]\[/html\]As you can see, this library is hosted on Stripe’s server. You don’t have to download and install it on your site. Note that this library is loaded over HTTPS, and your HTML page (i.e., the one with the payment form on it) must be loaded via HTTPS, too.
When using Stripe.js, your only requirement to be PCI compliant is that the HTML form is loaded via HTTPS.
For the form itself, let’s assume that the name of the HTML page is buy.php, and it will both display and handle the form:
\[html\]The form should use the POST method, and you’ll also want to give the form a unique ID value, for later use in the JavaScript code.
Within the form, you might as well go ahead and create a spot for showing errors. This also needs a unique ID value, and will also be used by the JavaScript.
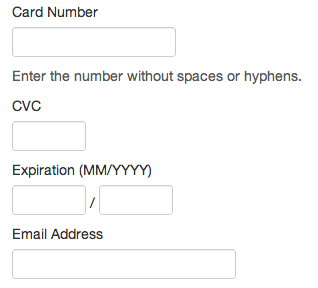
For the form elements, it’s really up to you what all the form has. At the very least, you’ll need to have fields for the:
- Credit card number
- Expiration month
- Expiration year
Logically, you may also want to take the Card Verification Code (CVC) number.
Stripe does not have a set validation requirement; Stripe will only validate the information it receives. If you pass Stripe the CVC number, too, Stripe will validate that along with the credit card information. The user’s name and billing address is entirely optional from a payment validation perspective. The street address is not reliable for validation purposes, although the zip code can be checked (for US addresses).
You don’t have to ask for the credit card type, either, as that’s knowable information from just the credit card number.
It does not matter what input types you use for these elements; text is fine, although you can use the HTML5 number type for the month and year, if you’d rather. In any case, the most important factor is this: do not provide name values for these form elements! You should also set the autocomplete property to off for each element, so that the user’s browser does not attempt to save the values:
\[html\]\[/html\]AGAIN: DO NOT PROVIDE NAME VALUES FOR YOUR PAYMENT FORM ELEMENTS!
You may be wondering what this name thing is all about. Well, Stripe takes advantage of a little-known quality of HTML forms. If you do PHP programming, you know that the names of your form elements correspond to the names of the indexes wherein you can access the form data: $_POST\['name'\], $_POST\['email'\], etc. Taking this knowledge a step further, it turns out that if you don’t provide a name for a form element, then that element’s value will not be accessible to the server. This is how you protect the user and your business: the user’s payment information never actually gets to your server! Your server will, however, receive the Stripe-provided token, which represents the payment option (it will be stored in a hidden form element via JavaScript and DOM manipulation).
If you want, you can add anything else you need to the form, such as the user’s email address or a password input (to create an account) or whatever. Those other fields will be standard HTML forms, with name attributes, whose values get sent to your server but not to Stripe.
Using Checkout
If you want something simpler than what I’m outlining and don’t mind relying upon JavaScript, then you’re in luck. Despite the fact that Stripe is crazy easy to use, Stripe has another route that is even easier. It’s called Checkout, and it simplifies the process of creating the HTML form and JavaScript required by the payment process. You’ll still need the server-side code that processes the actual charge, however.