, I had to break the subject down into two posts. So here’s the first of an informal three-part series on authentication and authorization in Yii. In this post, I discuss how the parts of Yii’s authentication system work together; much of what I say in this first post is also available in the Yii documentation, just not presented in this way. I also show a couple of quick ways to modify its behavior to suit your situation.
Most sites use some form of authentication. Maybe users have to login to post questions, to read content, or to administer the site. Whatever the case, a verification of the person is required before they can do whatever. As this is standard behavior, the default application created by the Yii framework has built-in authentication. When you generate a new site using Yii’s command-line tools, three files for managing authentication are created:
- protected/components/UserIdentity.php
- protected/models/LoginForm.php
- protected/views/site/login.php
And there’s also some code added to protected/controllers/SiteController.php that comes into play. The Controller file, gets the action going, of course. The View file is the login form itself. The LoginForm Model file defines the rules and behavior and the UserIdentity file defines a Model that performs the actual authentication.
\[php\]\[/php\]\[php\]\[/php\]At that point, you’re done. However, you most likely will perform authentication against a database table, so let’s see how you’d edit these files to make that happen. To start, let’s assume that the table name is Users, that you’ve already generated a Model for it, and that authentication requires an username and a password. As you’ll see, you’ll still only need to edit the UserIdentity.php file to make this possible, but in my next post I’ll walk through more elaborate customizations. Okay, with that in mind, let’s examine the authentication process…
\[php\]\['LoginForm'\]\['LoginForm'\]\[/php\]First, a new object is created of type LoginForm. That class is defined in the LoginForm.php Model file. If the form has been submitted, the form data is collected and the data is validated. If the data passes the validation, the user will be redirected to whatever URL got them here in the first place. If the form has not been submitted, or if the form data does not pass the validation routine, then the login form is displayed, and it is passed the LoginForm object. The default login form looks like this (note the reference to demo/demo and admin/admin, already discussed):

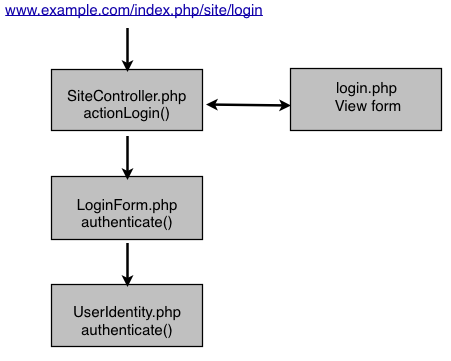
If there are no errors when this method is called (an error would be a lack of a username or password), a UserIdentity object is created, passing that object the submitted username and password. Then the UserIdentity object’s authenticate() method is called. This gets us to protected/components/UserIdentity.php, which defines the class and the method. If you’re having trouble following the process thus far, here it is pictorially:
Note that any errors stops the process from continuing and just re-displays the login form, with the errors reported.
\[php\]\[/php\]Now the $user object represents the User record with an username field equal to the submitted username. (The CUserIdentity class’s constructor takes the provided username and password and stores them in $this->username and $this->password, just to be clear.) You could, and might be inclined, to attempt to retrieve the record that matches both the username AND the password, but if you were to do that, you wouldn’t be able to provide more meaningful error messages: username doesn’t exist, username does exist but the password doesn’t match, and so forth.
\[php\]\[/php\]\[php\]\[/php\]\[php\]\[/php\]\[php\]\[/php\]So if there was no error, the user is logged in. The duration—the period for which they’ll be logged in—is either 30 days or for just the session, depending upon whether they checked the rememberMe box or not (see the login form image). If either error is present, it’ll be added to the current object, the validation will fail, meaning that the conditional in the actionLogin() method of SiteController.php will be false, and the login form will be rendered again, this time with the error message. The whole process therefore becomes:

That’s an outline of the basic process, using a User Model (based upon a database table), instead of hard-coded values. All of this information can also be found in the Yii documentation, just not written quite like this. To take this information further, and to make it more practical, my next post will show you how to modify all of the Yii-generated code in order to:
- Store the user’s ID so it can be referenced as they peruse the site
- Store the user’s “role”, like reader, editor, and writer, as well.
- Authenticate the user with their email address and password, not their username.
! As always, thanks for your interest in what I have to say and let me know if you have any questions or comments. Thanks, Larry